We are specialist | technican | Responsive | Perfection
we have professionnal skilled technicians for solving all types of TV issues,we are alwayes giving our best and customer satisfaction is our best priority.
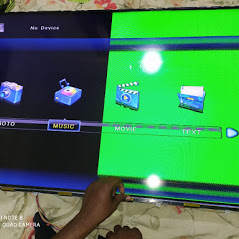
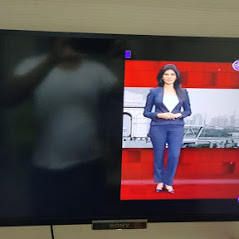
LCD TV is the old technology of TV ,we are solving all types of fault on this TV . most of the common faults are mother board failure , short circuit issue in power supply and different’s type of display issue is like double image, negative image ,colour issue,some disturbances in display and blank screen display
LCD TV – Picture Issues (Lines/Blurred/Double Images/Colour Distortion)
When using a TV with the Self Diagnostics option, try the Self Diagnostics test. For details, refer to the following Q&A: How to use the Self Diagnostics option.
Lines on the screen (vertical/horizontal lines, bands) Image diagram of symptom
Press the HOME button on the remote to display the TV menu screen.
When the same issue occurs in the menu screen
There may be an issue with your TV. Follow these steps to troubleshoot:
Restart the TV and check if the issue is resolved.
Turn off the TV and unplug the AC power cord (main lead).
Keep the TV unplugged for 2 minutes.
Plug in the AC power cord (main lead) and turn on the TV to check its status.
If the above steps does not help to resolve the symptom, the product may require service.
When there are no issues on the menu screen There may be issues with the broadcast signal source, Cable/Satellite box, IPTV, or other devices such as a DVD player. Follow these steps to troubleshoot:
Turn off any electrical or battery-operated devices that may be creating radio frequency (RF) interference.
If using an antenna, broadcast signals are reflected by nearby mountain or surrounding tall buildings and may cause ghosting in the picture. It is recommended to adjust the antenna direction and location.
Try plugging the power cord into a different electrical outlet and/or surge protector. These symptoms can occur if the electrical outlet is improperly wired or not producing the proper voltage. If using a surge protector or extension cord, it also could be faulty.
Press the HOME button on the remote to display the TV menu screen.
When the same issue occurs in the menu screen There may be an issue with your TV. NOTE: Images may look like they are trailing or the screen may be dark during use in a cold place. This is not a malfunction and will recover when the temperature rises back to normal.
Restart the TV and check if the issue is resolved.
Turn off the TV and unplug the AC power cord (main lead).
Keep the TV unplugged for 2 minutes.
Plug in the AC power cord (main lead) and turn on the TV to check its status.
If the TV is connected to an active and stable Internet connection, install the latest TV software.
Clean the TV screen.
If the above steps do not help to resolve the symptom, the product may require service.
When there are no issues on the menu screen There may be issues with the TV settings, broadcast signal source, Cable/Satellite box, IPTV, or other devices such as a DVD player.
For TVs with the Motionflow function, select Standard or Off.
If using an antenna, broadcast signals are reflected by nearby mountain or surrounding tall buildings and may cause ghosting in the picture. It is recommended to adjust the antenna direction and location.
The quality obtained from DVD discs recorded on home DVD recorders often varies due to different quality settings being used on the recorders. Picture quality from VHS tapes often appears to be significantly worse than other sources, symptoms often include grainy and watery picture.
Reset your TV to the factory defaults. Refer to the instruction manual supplied with the product.
Odd colours on the screen (Solarization, No color, faded, Intermixing/Spreading of color)
Press the HOME button on the remote to display the TV menu screen.
When the same issue occurs in the menu screen There may be an issue with your TV.
If your TV has a reset function for its picture settings, follow the instructions below to reset the settings.
Press the OPTIONS button on the remote.
Select Picture.
Select Reset.
Restart the TV and check if the issue is resolved.
Turn off the TV and unplug the AC power cord (main lead).
Keep the TV unplugged for 2 minutes.
Plug in the AC power cord (main lead) and turn on the TV to check its status.
If the TV is connected to an active and stable Internet connection, install the latest TV software.
If the above steps do not help to resolve the symptom, the product may require service.
When there are no issues on the menu screen There may be issues with the TV settings, broadcast signal source, Cable/Satellite box, IPTV, or other devices such as a DVD player.
If your TV has a reset function for its picture settings, follow the instructions below to reset the settings.
Press the OPTIONS button on the remote.
Select Picture.
Select Reset.
Check that the overall connections are configured correctly. Click here for the connectivity guide.
If using an antenna, broadcast signals are reflected by nearby mountain or surrounding tall buildings and may cause ghosting in the picture. It is recommended to adjust the antenna direction and location.
Turn off any electrical or battery-operated devices that may be creating radio frequency (RF) interference.
Reset your TV to the factory defaults. Refer to the instruction manual supplied with the product.
Other screen issues
If the TV is connected to an active and stable Internet connection, install the latest TV software.
Clean the TV screen.
If the above steps do not help to resolve the symptom, the product may require service.
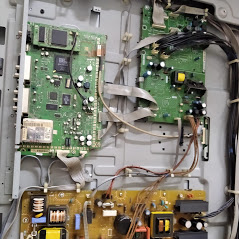
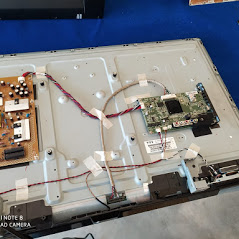
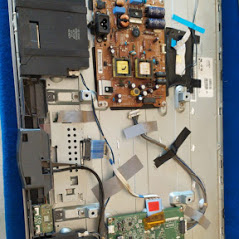
In this case, most probably the power supply unit inside the LED TV has issues. The power supply unit is responsible for receiving current and sending it to all the components of the LED TV. The power supply unit develops issues due to a sudden surge in input supply. Usually, the capacitors on the power supply boards fail. If you disassemble the LED TV set, you could verify this by spotting a leaking or bulging capacitor. These problems are common in modern LED Televisions and the repair work is fairly simple and quick. It is recommended to find a technician as replacing the capacitor would require soldering skills.
LED TV has Horizontal lines on start-up
In this case, the root of the problem is low signal strength in the set-top box cable that is connected to the LED TV. This problem might not show up if you plug that set-top box to an old television. The reason for this is that older TV sets required lower input strength to work. With the modern LED TVs set it’s not the case. They require stronger input signals. Thus, switching to an HD set-top box will most probably rectify the problem.
LED TV with no sound output
Disconnect the LED TV from the AC power, then press and hold the power button on the LED TV (not the remote) for 10 seconds. After waiting for a minute, connect the TV set back to AC supply and press power button once. Then try out other “sound out” from your TV to a set of speakers. If the speakers work, clearly the internal TV speakers are not working. If it doesn’t, it is most likely that the audio IC that drives the internal speakers has failed. It is common in these sets as they use inexpensive low powered amplifier ICs that heat up and fail. A simple replacement of the audio IC will do the trick here.
LED TV not connecting to WiFi
The first step is to locate if the problem is in the TV or the router. If the TV has no problems in connecting to your mobile device, then probably the router is at fault. Try updating the firmware of the router. If that doesn’t work, factory reset the router.
We are expert in repair of all brands smart TV and SONY,LG,SAMSUNG 3D brands and all types of 4k TVs
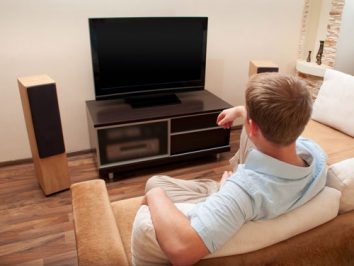
If you haven’t dived into your TV’s menu system, you might be dealing with annoying quirks you didn’t even know you could fix. The default settings on many TVs don’t always offer the best picture, especially when you consider that each video source (cable box, media streamer, Blu-ray player, game system) likely has its own ideal settings that apply. Here are easy fixes to four common picture problems. Fixing a Squashed, Stretched, or Cropped Picture Have you ever watched TV and thought that the picture looked a little off? Maybe the people look squashed, or maybe parts of the picture look like they’re disappearing past the edge of the screen. This is a common problem with many TVs, and it’s one you can easily fix.
Picture size is a setting that has many different names on different TVs, but they all do the same thing: Affect how the video signal the TV receives is displayed geometrically on the screen. Ideally, the picture is mapped pixel-to-pixel on the TV, but that isn’t always the case. Sometimes the aspect ratio is off, forcing the picture to be stretched or cropped. Other times the TV trims the edge of the picture to fit broadcast formats. When this happens, you need to fix the picture size. The Picture Size setting can be also referred to as Zoom, Wide, Aspect Ratio, or even simply just Picture. Check your TV’s settings menu for any item that sounds like one of those terms. If you aren’t sure if it’s the right selection, check what options are available, and look for Zoom, Stretch, Wide, or 16:9. Those options indicate you’re looking at the right setting. They also mean you’re looking at the wrong options to get the best picture on your TV. Stretched View Correct View For any modern game system, media hub, cable box, or computer that outputs at 1080p (1,920 by 1,080) or 4K (3,840 by 2,160), you want your TV to display the signal pixel-for-pixel if it’s an option. In the Picture Size menu, select Direct or Just-Fit. This will tell your TV to show off any video it gets from your connected device as it receives it, without stretching or cropping anything. This simple option can fix any weird distortion you see when you’re watching TV. If the pixel-for-pixel mode doesn’t help (especially if you use an older, pre-HD video source connected through composite or component inputs), try the 16:9 and 4:3 settings. Older game systems and DVD players output at a 4:3 aspect ratio, and they look better pillarboxed on modern TVs with black bars on either side to keep that ratio. If you connect a computer or some other devices to your TV, you might experience another problem: overzealous overscan. Before digital TV was broadcast, TV signals transmitted more of the picture than was intended to be shown on the TV. This extra frame of picture is known as overscan, and TVs are designed to trim it off. Some TVs still cut off overscan, and when they connect a video source they don’t quite know how to handle, that’s what they do. We’ve seen this often on Samsung TVs when connecting PCs to them. If changing the picture size leaves you with a picture that appears to be cut off at the edges, you’re dealing with overscan. Look through your TV’s menu system for a separate option called Overscan. It will likely be near the Picture Size option in the menu, but it could appear anywhere (including the Advanced Settings). Set Overscan to Off or Disable and you’ll finally see the full picture. How to Turn Off the Soap Opera Effect The “soap opera effect” is a common picture grievance that occurs when movement on the screen looks unnatural. It’s often caused by the TV simulating 60 or more frames per second (fps) when the source video doesn’t provide it. Most movies and shows are displayed at 24 or 30 frames per second. 24fps is the standard frame rate for film, while 30fps is the standard frame rate for produced television. Many TVs have a refresh rate of 120Hz, or can display up to 120 frames per second. They also often offer image processing features that can make movement appear smoother to match that frame rate, or even simulate higher frame rates. These features are effective at making a 24 or 30fps video look very smooth. The problem is they make the video look too smooth. It appears unnatural and jarring, resulting in the soap opera effect. They can be nice when you’re watching sports or playing video games, but for most movies and TV shows, they just make everything appear weird, like you’re standing behind the camera and seeing exactly what it sees. The solution is simple: Turn off motion smoothing. That’s it. Just because a TV has a 120Hz refresh rate doesn’t mean you need to use it. Disabling motion smoothing features will stop the soap opera effect. Movies will look like movies and TV shows will look like TV shows again. Putting your TV in the Theater or Cinema mode might turn off those features automatically, but if it doesn’t you’ll need to disable them manually. Read our guide to turning off motion smoothing to find out where the setting is buried in the menu systems of current LG, Samsung, Amazon Fire TV, Android TV, and Roku TV televisions. What to Do If the Picture Is Too Dark Have you ever noticed the picture on your TV looking brighter or dimmer depending on the time of day? That’s likely due to a power-saving feature that’s the bane of cinephiles everywhere: the light sensor. Many TVs have ambient light sensors that adjust the brightness of the picture on the fly, based on whether the room it’s in is bright or dark. It sounds handy on paper, but it means you can’t ensure consistent control of the TV’s brightness yourself. Backlight Settings You can keep direct control over your TV’s brightness by turning off the ambient light sensor. This setting can be hidden in several different areas of your TV’s menu system, depending on the interface. For Android TVs, it’s a setting found in the Backlight menu of the Picture settings. On LG TVs with webOS, it’s in the Energy Saving menu. Disabling any setting that says Ambient Light or Intelligent Sensor will turn off the feature. You might also have to switch picture modes to make sure it stays off—and steer clear of any Automatic Power Saving (APS) picture mode, since it will also automatically adjust your TV’s brightness and often err on the side of dimmer. For more precise control, you can also disable any energy-saving features on your TV. These don’t necessarily use light sensors, but they do tweak the TV’s backlight to save electricity. Look for any Power Saving, Energy Saving, or Eco setting and set it to Low or Off. Then you can adjust the TV’s backlight manually to suit your tastes. Of course, this will result in your TV using more power unless you prefer looking at a dim picture; depending on the the type of the panel, and the picture mode, a 65-inch TV can consumer anywhere from 80 to 300 watts under normal viewing conditions. How to Fix the Color on Your TV If you’ve watched TV and thought the picture looks a little weirdly blue or green, or that skin tones appear unnaturally yellow, your TV’s color settings might be off. A full calibration can get the best possible colors out of your TV, but this is a complicated, expensive process that most users won’t want to go through. Fortunately, there are several simple settings you can cycle through to get pretty accurate colors out of the box. Video signals are based around the D65 white point, a standard value that sets white to a color temperature of 6,504 Kelvin. Without getting into the extensive math behind it, this is what white should look like under average midday light. The default picture modes of TVs tend to set white to appear slightly bluer than it should. This setting is known white balance, and it’s available on nearly every TV. Most picture modes, like Normal, Standard, and Vivid, set the white balance intentionally cool. This makes the picture pop out more, but it isn’t natural. Picture Settings In our testing, using a TV’s movie-focused picture mode will generally produce the most accurate colors. This picture mode might be called Movie, Cinema, or Calibrated, and it will automatically set color temperature to be as close to what filmmakers intended out of the box, without a full calibration. Set your TV to this mode if it’s available. If that doesn’t get the job done, set your TV’s white balance to the warmest available setting. You just need to know how to find that setting. In your TV’s menu system, under picture options, look for a value called White Balance or Color Temperature. This setting should give you a few different options like Cool, Normal, and Warm. Choosing Warm will likely give your TV the most accurate colors you can expect out of the box. If you see more than one Warm setting, or if there’s no Warm setting, you’ll have to choose the option that makes the picture look the least blue-green and the most red-pink. Don’t worry; these presets won’t horribly skew the colors, and even if the pinkness of the picture looks odd at first, it’s actually the most accurate of the options. Near these settings you’ll likely find advanced submenus that invite you to calibrate the color or tune the white balance. Stay away from these menus, or any option that invites you to change numbers. These are settings are for calibrators to work with, and it’s very easy to completely warp your TV’s color accuracy if you don’t know what you’re doing. If this happens, you’ll need to restore your TV’s default settings and start again. Remember, even if you have a brand new TV, it may not be configured properly for the best possible picture, so it’s worth scrolling through the settings menu to check things out. If you’re looking to buy a new TV, meanwhile, see our stories on What TV Model Numbers and SKUs Actually Mean and How to Choose the Right Screen Size. And check out our explainers on 4K, 8K, and HDR to figure out what features are important to you.
Gallery
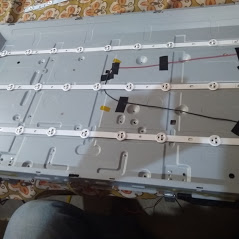
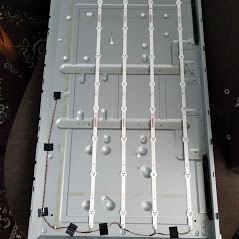
NEW: Here all types of LED,LCD,SMART TV,4K,3D TV photos previously we repair done .
Get in touch
WE ARE ALWAYS READY TO SUPPORT.
For any help/queries contact us through 7795716893 (whats app us) for fast service.


 Stretched View
 Correct View
 Backlight Settings
 Picture Settings